


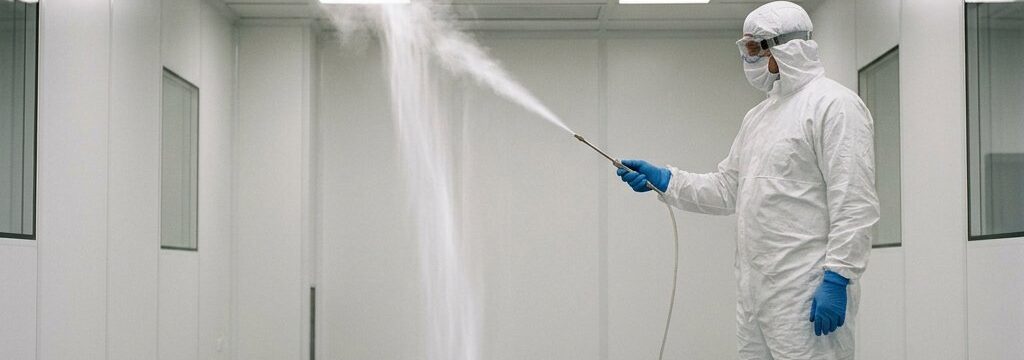
Cleanroom smoke study

A smoke study makes airflow visible in the cleanroom. It shows not only whether air is technically supplied and extracted, but above all whether critical zones, first air and pressure differentials really provide protection in practice. That is precisely where the value lies: operator movements, interventions, transfers, open doors and small layout changes can affect the intended airflow without this being fully visible from drawings, flow measurements, particle counting in cleanrooms or pressure measurements.
Table of Contents
- 1How airflow, pressure differential and cleanroom classes provide protection together
- 2When a cleanroom smoke study is needed
- 3What Annex 1 and inspections require of smoke studies
- 4What you define in advance in the protocol and test set-up
- 5How to choose smoke medium, equipment and cameras
- 6How execution works in practice
- 7What you assess in the footage and in airflow behaviour
- 8How video, reporting and risk assessment come together
- 9What you do in the event of deviations and when you retest
- Show more...
Key takeaways
- Visualise airflow to confirm protection in critical zones and first air under at-rest and in-operation conditions.
- Plan smoke studies with a clear protocol, defined critical points, injection and camera set-up, and acceptance criteria.
- Select a suitable smoke medium and stable equipment; ensure visibility, safety and high recording quality.
- Capture realistic worst-case operator actions, transfers and equipment effects with appropriate camera angles.
- Use outcomes for CCS, monitoring placement, training and corrective actions; requalify or retest after changes.
That is why a smoke study is more than a visual demonstration. In GMP environments, airflow visualisation is an important part of qualification, change control and contamination control. During inspections, you are also expected to be able to substantiate how air behaviour protects the process and critical surfaces under realistic conditions.
How airflow, pressure differential and cleanroom classes provide protection together
A cleanroom limits contamination by supplying filtered air in a controlled way, removing contaminated air via returns and maintaining a pressure hierarchy between cleaner and less clean zones, with pressure difference and ventilation in cleanrooms directly linked. This reduces the chance that particles or micro-organisms reach a critical area. The required classification is usually determined in accordance with ISO 14644-1, while GMP zones are mainly relevant for pharmaceutical and aseptic applications. Those systems align with each other, but they do not have exactly the same function.
At ISO 5 or Grade A, protection is most critical: first air must continue to directly shield the product, open containers or other critical surfaces. In theory this sounds straightforward, but in practice machine height, heat sources, doors, operator posture and the position of materials can deflect the airflow. That is exactly why visualisation is needed: you want to see whether the design also does what it is supposed to do under actual conditions. Where leaks or bypass at supply filters are suspected, a HEPA filter integrity test helps verify actual filter performance.
When a cleanroom smoke study is needed
Smoke tests are visual airflow studies used to verify whether unidirectional airflow, first air and the air-sweeping effect in critical zones are maintained.
| Situation or area | What you assess with the smoke study | Why this moment is important |
|---|---|---|
| Room qualification for new or modified cleanrooms | Basic pattern of air supply, sweep towards returns, pressure behaviour and protection of critical zones | Shows whether the design, air distribution and layout work in practice and supports qualification |
| Equipment qualification and set-up of process or filling equipment | Effect of machine height, heat, moving parts and positioning on first air and flow shadowing | Equipment can locally disturb a well-designed airflow pattern |
| Aseptic interventions and operator actions | Whether hands, arms, tools and open operations block first air or bring contamination into critical areas | This is often where the biggest differences arise between the SOP and actual execution |
| Material transfer and transfers between zones | Risk of backflow, mixing or ingress from a lower classification | Transfers are a known point of attention in contamination control |
| RABS, isolators and passthroughs | Air behaviour around openings, glove ports, doors and adjacent areas | Barrier systems only protect properly if boundary interfaces also remain stable |
| Rooms with mixed airflow | Recirculation, dead zones, lateral movement and disturbance when doors are opened | Not only unidirectional zones, but also background rooms can create risk |
| After changes, maintenance, downtime or deviation investigation | Whether the air behaviour still matches the validated state | A smoke study is not only for commissioning, but also for change control and root cause analysis |
What Annex 1 and inspections require of smoke studies
Where GMP applies, Annex 1 expects airflow visualisation to demonstrate how critical zones are actually protected. The point is not that "smoke is visible somewhere", but that you substantiate how airflow patterns preserve first air, prevent ingress from less clean areas and provide protection in both at-rest and in-operation conditions. This is an essential part of contamination control, especially in Grade A environments and adjacent zones.
Regulators therefore see smoke studies as evidence of process understanding. The recording should reflect the actual process set-up, normal working practices and relevant worst-case situations. A one-off, static demonstration without operators, without material movement and without context says little about the real risk. The relationship with equipment, interventions and interfaces between zones must also be visible.
The outcome of a smoke study therefore does not stand alone. It must fit within the Contamination Control Strategy, the set-up of a cleanroom monitoring plan, and the qualification status of the room. To place airflow visualisation within the broader validation workflow, see cleanroom validation steps. For new or modified cleanrooms, it is wise to take that relationship into account already during design, engineering and validation coordination, so that air behaviour is not treated only at the end as a separate checkpoint.
What you define in advance in the protocol and test set-up
- Clearly describe the objective and scope: which room, line, zone or equipment is being assessed and which question the smoke study needs to answer.
- Define the critical points, including product contact surfaces, open containers, Grade A or ISO 5 positions, transfers and interfaces with adjacent zones.
- Determine the operating state in advance: at-rest or in-operation, line settings, door positions, staffing levels and which interventions should be simulated as realistic or worst-case.
- Assign roles and responsibilities to validation, QA, operations, engineering and subject-matter experts, so that execution and assessment are unambiguous.
- Define smoke injection points, camera set-up, acceptance criteria, deviation recording, repeat rules, and formal review and approval before the test starts.
How to choose smoke medium, equipment and cameras
| Component | What to look for | Practical effect on the study |
|---|---|---|
| Smoke medium | The medium must reliably follow the airflow, be sufficiently visible and be suitable for the room, process and cleanability. | An unsuitable medium can disappear too quickly, settle out or give a distorted picture of the actual airflow. |
| Safety and compatibility | Assess whether the medium and its use are compatible with the room, materials, product risks and internal safety rules. | This prevents additional contamination risk, unwanted residues or limitations that could later invalidate the test. |
| Generator and output | Choose equipment with stable, reproducible output and sufficient control over the amount and duration of the smoke injection. | Too much smoke masks patterns; too little smoke makes subtle disturbances invisible. |
| Accessories and operation | Consider hoses, nozzles and, where possible, remote operation, so that the operator does not unnecessarily disturb the airflow. | This allows you to see the behaviour of the room or set-up, not mainly the effect of the tester. |
| Environmental conditions | Temperature, relative humidity and the heat output of equipment visibly affect air behaviour. | Thermal plumes or condensation might otherwise be wrongly interpreted either as a design flaw or as a normal pattern. |
| Background and lighting | Ensure sufficient contrast, an uncluttered background and lighting that makes the smoke visible without reflections dominating. | A good visual set-up makes airflow lines, recirculation and shadowing much easier to assess. |
| Cameras and viewing angles | Position cameras so that the entire critical path is visible: from first air to the product zone and discharge towards the returns. | You then assess the air behaviour itself, not only the point where smoke is introduced. |
| Recording quality | Check focus, resolution, time registration and whether actions, openings and interfaces remain in view. | This makes comparison, review and later risk assessment more reliable and audit-ready. |
How execution works in practice
A good smoke study starts with a dry run. This lets you test cameras, rehearse interventions, fine-tune smoke injection and check whether normal working practices are being realistically reproduced. It prevents the final recording from becoming mainly a technical demonstration rather than a useful validation study.
You then distinguish between at-rest and in-operation. At-rest shows the basic airflow pattern, but only in-operation shows what operator movement, open operations and worst-case occupancy do to first air. It also shows when it makes sense to include measuring cleanroom recovery time. In unidirectional zones you look at the sweep towards the returns; in barrier systems and background rooms, at recirculation, lateral movement, upward airflow and shadowing behind equipment. This is often where it becomes clear that the SOP and actual execution are not fully aligned.
What you assess in the footage and in airflow behaviour
- There is clear unidirectional airflow over critical points, and first air is maintained where direct protection is needed.
- There is no ingress from less clean zones and no persistent turbulence or stagnant areas around open critical surfaces.
- Deviating patterns such as thermal plumes, cross-draughts, eddies, diffuser jets and flow shadowing behind machines or hands are clearly recorded.
- The assessment focuses on contamination risk: not every visually striking effect is critical, but every pattern that interrupts first air is.
How video, reporting and risk assessment come together
- A complete evidence package includes raw and assessed video recordings, the test conditions, settings used, annotations or stills, and a clear link to the approved protocol.
- The report states who performed the test, when it was done, what condition the room was in and which interventions, transfers or worst-case scenarios were simulated.
- For each recording, document what was observed, where airflow deviates and how that observation is interpreted in relation to first air and zone protection.
- Describe deviations and follow-up actions explicitly, so the footage does not remain disconnected from decision-making.
- Then use the outcomes in risk assessments, the positioning of environmental monitoring, operator training and, where relevant, the substantiation of process choices or media fill design.
What you do in the event of deviations and when you retest
If results are insufficient, follow-up starts with a reassessment of the footage and verification of the test conditions. You then determine the likely cause and the impact on product, process and zone control. Typical corrective directions are rebalancing airflow, adjusting the layout, moving equipment, adding shielding, rewriting the work sequence or additional operator training.
Retesting is logical after technical changes, maintenance to the air handling system, new equipment, changed interventions, prolonged downtime or recurring deviations. Periodic requalification is also part of the cleanroom lifecycle, especially around the most critical ISO 5 or Grade A positions. In this way, the smoke study does not remain a snapshot, but becomes a practical tool for demonstrably keeping contamination control up to date, with contact with our cleanroom specialists as the logical next step.
Frequently asked questions
Related articles
Cleanroom interlock: operation, types and design considerations
A cleanroom interlock prevents…
Material Transfer in Aseptic Cleanrooms
Material and equipment transfe…
FFU vs AHU in Cleanrooms
The short answer: an AHU condi…
